Showing posts with label Crafts. Show all posts

Monday, March 19, 2012

Wall Paper

Over the break I lined my drawers with wall paper that was laying around.
I had to go over the edges with glue, so they turned out in the end, and now my drawers are a lovely blue inside.

Friday, March 16, 2012

Easter Basket

Decorator Basket from Gifts Kids Can Make by Sheila McGraw

What you need: 0.5 m fabric (linen) I used an old pair of pajamas, Masking tape, 6 m medium weight rope (I used nylon lightweight rope, so I had to use more to make the same size basket), Craft glue (I didn’t end up using this), Scissors, Ruler, Measuring type, Pen, For a handle, use extra fabric, robe and wire (I used more masking tape and a needle and thread)
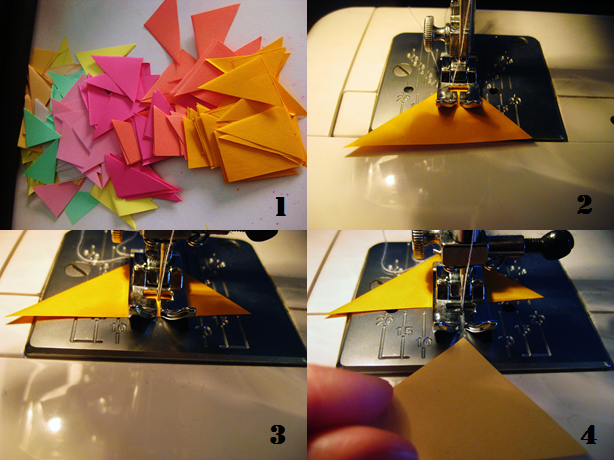
1. Tear 5 to 10 strips of fabric about 4 cm wide.
2. Wrap masking tape around ends of the rope to prevent fraying. Measure and mark, but do not cut the rope.
3. Lay the end of one fabric strip onto the rope so that it hangs over the end on an angle. Tape in place.
4. Begin wrapping the fabric around the rope, keeping it angled so it overlaps.
5. When you come near the end of one stip (10 cm) tuck in the next strip so they overlap.
6. Keep wrapping till you get you your measured mark, tape fabric in place, but do not cut the rope.
7. Go back to the beginning of the rope, tuck and fold the overhanging end of fabric around the rope, glue into place( I skipped this step). Tear 8 narrow strips of fabric about 60 cm long (I used yarn). 8. Tie the center on one narrow strip (or yarn) to the finished end of the rope. Bend the covered end of the rope over, using the yarn to tie in place. Tie the seven more strips to the rope with equal spaces in between.
9. Begin to coil the rope. When you come to a strip, tie it around the rope, continue till the spiral is 18 cm across.
10. To make the sides of the basket, continue to coil the rope, but instead of placing the rope beside the last, place it on top, then tie. Continue till you get to the end on your fabric wrapping rope. If the basket is not high enough, just wrap more fabric around the rope (that’s why you didn’t cut it yet!). At this point I decided I wanted more pieces of yarn to hold the basket together because I founf there was to much space between the yarn. I added in pieces by going back to the bottom of the side of the basket, and tieing up to the top.
11. When you’re happy with the size of your basket, cut the rope and finish the end like you did the other end. Trim the lose ends of the strips or yarn then tuck them between the coils, or tie in decorative bows. 12 If you want a handle, cut a length of rope the size on the handle you want, and wrap in wire or masking tape, so it will stand on its own. To attach to the basket, bend the wire or fabric around the top coil. Wrap the handle in fabric, and attach to the other side the same way.
Now you have a lovely basket for Easter, holding keys, soaps, fruit, bread, the list is endless! Try using ribbon instead of yarn or fabric to tie the basket together. These would also be great for gift baskets. Enjoy!

Monday, March 05, 2012

Magazine Page Bows

I love making these fun bows out of magazine pages, they’re so easy to make, and add that unique finishing touch to your gifts!
1.You will need Scissors, a craft brad and, one magazine page, try to find one with lots of colour and minimal words (like a full page add) the colour it the first thing you will see!
2.Cut the page vertically into 2 cm strips, I just eyeball it and I get 7-8 strips. You can make these thinner for a different look.
3.Like the picture, hold one strip in the middle with the ‘wrong’ side facing you. Curve the top of the paper and hold in the middle. The ‘wrong’ side should be showing on the end of the strip.
4.Repeat with the bottom end. It should look like a figure 8.
1.Poke the brad through the 3 layers of paper.
2.It should look like this on the back.
3.Fold another strip the same way.
4.Put the new figure 8 on the bottom of the first, and poke the brad through.
5.Repeat for the rest of the strips, and spread the brad ‘legs’ out to hold.
6.Now you’ve made a beautiful environmentally friendly bow to put on your gifts!
Make a bunch so you’re ready for the next birthday or holiday!

Saturday, February 18, 2012

Current Projects

NYC book; got the photo paper.
Started my paint by number.
The denim quilt.
Always the backpack.
Getting started on the Montreal book.

Tuesday, February 14, 2012

Top 5 Hand Made Valentines

I've seen so many amazing handmade Valentine goodness around for the last month, and I've narrowed down my favourite in 5 categories. When I think of Valentine’s Day, I don't think of store bought cards, flowers and chocolate for all the romantic relationships. I think Valentines is for everybody you love, your children, friends, family, co-workers, it’s a time to appreciate all your friendships. I love making things by hand, so homemade cards, food, gifts and decorations are the things I look for when a holiday comes around.

Favourite Card:
LandofNod

Favourite Decoration:
OhHappyDay

Favourite Vintage:
TwoCrazyCrafters

Favourite Gift:
Pitterandglink

Favoutie Food:
Bakerella

Monday, February 13, 2012

DIY Paper Curtain


These beautiful paper curtains are so easy to make, and look great in a window with the sun behind them.


1. Gather your supplies: scraps of colourful paper or paint chips in any shape (triangles, squares, circles, hearts, starts, etc.), and a sewing machine with white tread.
2. To start sewing, make sure you have at least 10 cm of tread pulled behind the needle, this is what you will use to tie your curtains to a curtain rod.
3. Sew through your first piece of paper.
4. When you get to the middle of the paper, line up the next piece.


5. Let the needle run through nothing for about a cm, then let the feet grab the next piece.
6. Once you have sewn through the middle of the 2nd piece, line up the 3rd
7. Continue until your curtain is as long as you want it to be to fit your window, door frame, etc.
8. Tie onto a curtain rod and enjoy!

Wednesday, February 08, 2012

Hand Made Valentine Cards

Oh! I've wanted to write this post for a while but I had to wait until the last minute to finish these (of course) for my Girl Guides. These were really fun to do, I always wanted to make Valentines since watching Be My Valentine Charlie Brown when I was younger, but when the time came to it, I never got around to it. Since I've joined Pinterest aswell as adding more blogs to my list, I've had more holiday ideas coming together (and more time to plan them, not last minute)


Yes they look like an 8 year old drew them, but I think they're sweet anyway. Don't be afraid to draw, you'll only get better!
Hope this inspirers you to break out the crayons and markers and whip up some homemade cards!
Happy Valentine’s Day!